From Richard Bach

That’s what learning is, after all; not whether we lose the game, but how we lose and how we’ve changed because of it, and what we take away from it that we never had before, to apply to other games. Losing, in a curious way, is winning. - Richard Bach

Sunday, June 19, 2016

Replay 6

For this replay I wondered if Howe went wide on the NE side if he could overwhelm the colonials no matter what. I keep trying to break this game (by finding the perfect strategy), so let's see how I do.

So there is my initial setup. As you can see, Washington got a heads up. I have replaced Sullivan's Marylanders with my own personalized piece "S Strand - Minnesota". A lot of people don't realize that the first Minnesota of Gettysburg fame made its first appearance at Brandywine!

Also, you will note another little game aid that I made. It is a half width block for easily determining if half your piece is occupying terrain or not, or for quickly and accurately determining where the  middle of your unit is. You'll discover I like making bits and such for my games.


Back to the game, you will see the first turn combats. Cornwallis has entered on the NE side as predicted and since the rebels were Bogarting all the roads he had to enter in line. as per Greene's plan, the British couldn't close with Wayne's Brigade along the Brandywine, but he did make contact with two brigades. The upper one is a Cav on Cav encounter. Washington was hoping to make Cornwallis move first, but when the dust cleared and everyone had rolled to alter the turn sequence, Cornwallis moved last.


And the combat resulted in a couple of retreats. Greene is not trying to hold any ground at this time, he's just falling back. The intent is to have his line reformed by the time Howe gets organized for an attack.
                                               So, on to turn 2 (3:30 in the afternoon)

When all is said and done, Greene has rebuilt his line. Here it is late afternoon and the British seem stuck, this could be gravy depending on the gods of war (dice).

Knyphausen's Highlanders have taken Jones' Ford! Cornwallis has blasted a hole in Greene's beautiful line, this could be the beginning of the end for the rebels.


Wheedon's Virginians fall back from Fraser's Scots and their two hand swords. Bland repulses Howe's cav attack. Still no units lost by either side!


It's 6:30 and there's not much light left. Weedon's Virginians find themselves in a target rich environment and Prescott's men charge across Brinton's ford to storm the Underhill farm. Meanwhile the colonials finally come to grips with the darn Hessians across Pyle's Ford whilst Strand's first Minnesota fixes bayonets and gets ready to charge across Chadd's Ford and into the history books.


And in a bloody turn we see the Virginians turned into a vaporous blue mist, Prescott's men and their North Carolinian adversaries battle to the last man and Lord Stirling brings down those Hessians. So far the battle is a draw, 2 blocks each and no roads controlled by the British. We'll have to see if the British can swing a victory before the moon rises.
                                                  Prescott v. Nash and the dice of death.
The last gasps of battle before night falls and shuts the book on the day's events. Even the hobbits can't succeed as they emerge from the woods into a hail of musketry. Elsewhere the British just can't find their way in the diminishing light and smokey battlefield. There is a last clash as the First Minnesota dashes across Chadd's ford and locks horns with the Hessians!


Exposing the combatants by name.

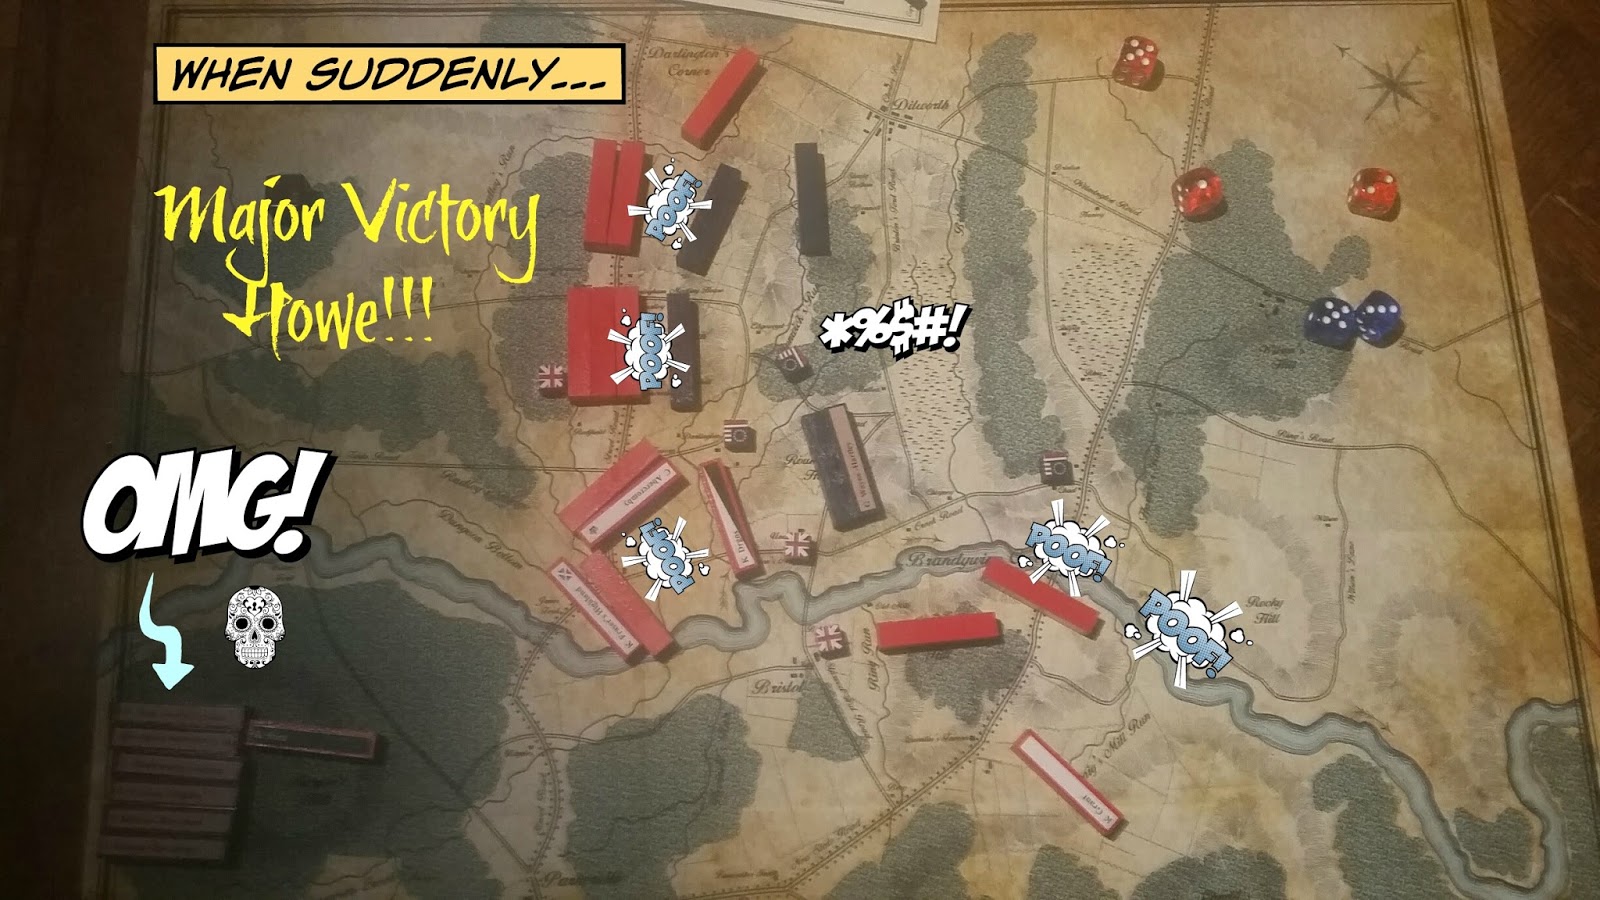
Finality, the numbers don't lie.


                All that blood and honor, all to draw. The last action so hot the map is ablaze!
That also demonstrates that a sweep wide is no guaranty of victory. I'll have to try it again with a more authentic colonial set up and see how they British fare.

Monday, June 13, 2016

Parchment Rulebook

As a playtester I was lucky enough to get an advanced copy of the game. Unfortunately, the rulebook I got is not the final version, a few kind of important changes were made. This meant I no longer had an up to date rulebook. I did have a pdf of the latest version of the rules, so with that and some parchment paper and my handy printer, I printed out a copy of the rulebook and did a quick and simple binding. Below in pictures with comments I show you what I did. This first picture is what the finished rulebook looks like.


Sunday, June 12, 2016

What makes PB: Brandywine so darn replayable

Since Brandywine is a simple fast playing wargame with a small number of units, how is it so endlessly re-playable? Is it? If so, why? Well, let me tell you IMHO what makes this game so great.

First off, all other things aside, it plays quickly for a wargame. I played a game last night and took pictures and kept notes to blog about it, and I finished in under 30 minutes! Admit it, no one wants to spend 4+ hours LOSING a game. If you lose, for whatever reason, double down and go for best of three! With Pub Battles; Brandywine you will have the time.

Secondly, this is a wargame that you will spend more time playing than looking up rules. This is a game that after the first 2 or 3 games you will rarely, if ever, look at the rules again. This is not because it is so Yahtzee simple, it is because the rules are intuitive. There really aren't any gamey ways to rules-win this thing.

But the real secret to this game's never ending fascination and re-playability is the positive synergy that the admixture of turn order and rules of engagement coalesce into, creating an ever changing kaleidoscope of opportunities and twists of fate. Here is the critical mechanic to understand, you can move even if an enemy unit moved adjacent to you! There are no locking zones-of-control. This means that if your command is not picked to move earlier than your opponent, or if  you are able to delay your command's movement, you can choose which battles to fight (or if you are trying to capture some critical real estate, you can try to move before your opponent).

Of course, at first blush this seems too good to be true. A unit just walking away from combat at its convenience. Well, that's not really what is happening in a Pub Battles game. Rather than thinking of it in a linear "I move/They move" sense, it is important to think of it in the relational terms of "those units started in those positions in those conditions and after an hour and a half they were in these positons in these conditions."

Pub Battles accepts that there is no way, no detail of simulation, that can cover all the eventualities of combat. For every rule that simulates a certain event or condition, there are countless similar events and conditions that can't be simulated because the rulebooks and the players that must read them can only cover and retain so much. Better to design for effect. If two units meet in combat they will fight until one or the other retreats in disorder or is eliminated, sometimes both retreat in disorder simulating combat to exhaustion without anybody getting the upper hand. As a General at the command post, that is all the information you need and are given.

The end result is a quick and fun game that is endlessly re-playable.

Replay 5


This game opened with two musings. First, how fast could I play a game? Second, how different will this game be if I start with the same setup I've used before and have Cornwallis perform the same flanking maneuver (Replay 1)? As it turns out, quite a bit different!

 So here we are with Knypshausen demonstrating across the river. Washington has the Pennsylvania Militia to the SE hoping they won't be needed, and Bland's Cavalry watching for a flanking maneuver from upstream on the colonial right. Note that however major the threat may be from any quarter, Washington will have to keep troops along the river or the Brandywine will be lost. This allows the British to hold down a number of Colonial units with no actual threat to their own units.
And Cornwallis enters on the NE side of the Brandywine. Sullivan scrambles to throw up some sort of defense while still holding Wistan's ford. Note that the British, staying in line, move only 1/3 of a full move due to the terrain. All they need to do is capture Street Road without suffering more losses than the rebels and they will have a major victory.


 At the end of turn 2 Fraser's Highlanders have scattered Nash's North Carolinians and Henry Knox has scrambled over the hill to save the American cannon, although they too have had a rough go and are a bit disorganized. Crossing a river, a river defended with artillery backed infantry, is no easy feat!
 At the end of turn 3 we see what happens when the rebels get out maneuvered and drawn into combat. They stay alive by falling back, giving ground, and keeping their battered units in the field. The problem is that they have had to give up too much ground and now they are spent, can't retreat without surrendering the road, and the redcoats are in their rear! Note how 4 British units are tying up 6 rebel units from entering the critical battle to the North.

With one turn left the rebels still hold Street Road and with only one unit lost the British are only barely eeking out a minor victory. If they can hold on and give better than they get, unlikely but still possible, they could actually win this thing, or at least stave off a drubbing...

But no! Everything falls apart for them in the last turn. They get outmaneuvered and end up fighting at a disadvantage at every point all along their line AND the beleaguered and spent troops collapse before the invincible British assaults. They lose 5 brigades and all their commands have become ineffective in one turn of fighting and the only troops the British sacrifice are Stirn's Hessians. They do hold Street Road, but the British finish with a 6-1 Major Victory!

I played this game in under 30 minutes, which could have been under 20 if I didn't stop to take pictures and jot down notes. This is wargaming at its best! This would allow a best of three match in one evening with time to spare.

Tuesday, June 7, 2016

Replay #4

I hadn't really planned on blogging about this particular game, but by turn 4 the Americans seemed to have it pretty sewn up and there had been no casualties in terms of lost units, just heavy, if desultory, skirmishing. I found this interesting, so I decided to follow it the rest of the way through. I'm glad I did because the battle got real interesting at that moment...

Only two turns left and the British have not made any serious headway. Even Street Road seems pretty secure with Greene's fresh command ready to defend it. Note the Gettysburg-esque fishhook!


That was the beginning of turn four. At the end of turn four we get quite another picture.

The British stop pussy footing around and decide to take Street Road. Mathews strikes hard and two of Greene's Brigades go "POOF!" in a fine pink mist. Fraser's Highlanders take out another Brigade and Greene's Command is suddenly exhausted. Tarleton charges the advancing militia and after engaging for sometime both fall back entirely spent.
After almost a full day of tense but uneventful feint and counter-feint the timbre of the contest changes dramatically and in a short time the battle seems to be determined as was so often the case in The American War of Independence.


But wait, Washington isn't ready to concede the day. There is a little light left and with it he decides to commit all in a desperate last gamble. The Americans come alive and everybody surges forth to drive the British from Philadelphia!
But yeah, No. That doesn't happen. Henry Knox's Artillery is captured by Cornwallis and all the American attacks are blunted by the stout British. Note that historically, this probably would never have happened as Washington was more concerned with saving his army once the British had crossed the Brandywine, but this is just a game and the what-ifs are half the fun! British win 4-0.


Sunday, June 5, 2016

My Pub Battles Compass


First off, for all those who know, this is not a compass, it is a divider. A compass is used for drawing circles. A divider is used for navigating and measuring for drafting purposes, but if I just said Divider in the title, many would have no idea. So, there it is.

I have decided to put up a quick post about the divider I use for Pub Battles. This divider originally had needle sharp pointers which held it firmly in place, but also left marks in my map which I wanted to avoid. Upon examination I found that those sharp needles could be removed by loosening the nuts and I replaced them with push pins that have the rounded plastic ends. Before tightening I made sure to allow enough of the pins to stick out that the rest of the compass did not interfere with the blocks when measuring.

The other reason I wanted the round ends is so that I could pack it in the tube with the rest of the game components and it wouldn't be damaging anything with the pointy ends. Now if you noted the scale, this divider is rather small. It is around 4". Expanded to the maximum degree it will just measure 1/3 of an infantry move. That is fine for me. Almost every distance I need in PB: Brandywine is measurable with that increment. When I move my cav block I'll use a stick. For everything else, there's this divider. Note also that this divider uses the screw adjustment. The plus side is that it doesn't move in or out unless I turn the screw. The down side is it's a little more effort to change the measurements, but since I only use it for one increment, that is fine.